Monday, April 29, 2013

POP Art POPsicles!

My Kindergartners are learning about different genres and styles of art and they recently made these absolutely ADORABLE Pop Art POPsicles! We used a 12x18 sheet of white paper, folded into fourths for the background. Tempera paints were used to paint each section a different color.

Students then used painted papers* to create their POPsicles. For some classes we used real popsicle sticks for the sticks and for some classes we just made them out of strips of paper. Each looked great.

*Sometimes I have students create painted papers for future use when they have "free draw time" when a project is finished. At this time of the year I usually have a TON of unclaimed (no name) artwork waiting to be claimed. If it is not claimed I cut it up for use as painted paper. Sometimes I have students that move away before a project is finished--- and their work gets cut up, too. Rogue, I know...but it works for us!


A refreshing summer treat, and an adorable way to teach students about Andy Warhol!

Friday, April 26, 2013

African Dancers


I have had to get "creative" with some supplies this year...stretching budgets and resources quite thin. Scrimping and scrapping and now I just found out THAT budget is going to be cut in half for next year. Anyone else in the same boat?
I had some faux African printed papers in my cabinet that I usually use for quilt block patterns, but I thought it would be nice to, you know, use them for an AFRICAN project, maybe?!
I did these with my second graders, and they took two days. On Day 1 we painted a 12x18" paper yellow and orange. We also used the African print papers to cut out the "robes". I had the students use Sharpies to draw a necklace on one robe, a sash on another, and a belt on yet another.
On Day 2 we used a ruler to draw the "frame" around the edges, glued on the robes, and brought our dancers to life! I did have different criteria for the "frames"- designs had to be geometric in nature, and patterned. Dancers had to have different hairstyles and each needed to be standing in a different position (legs and arms). One of my second graders told me they reminded her of a Kokopelli she has at home (different culture, but they look similar! Nice!!!) I am proud of the way they turned out, so striking in real life!
Note: I have seen a few different versions of these floating around on Artsonia and I love everyone's different interpretation...just like the different interpretations our kids have! Happy Friday, let's dance!


Wednesday, March 20, 2013

zentangled zebras

My fifth graders just finished up these zentangled zebras and I JUST LOOOOOOOVE THEM! They were large...about 12x18". I had them draw the zebra head, trace it in black Sharpie, and then zentangle until their hearts were content!


The whole point of a Zentangle is to create a state of "zen"...I think maybe half of them were in "zen" and the other half were stressed out trying to think of more designs...or finish!
*If they finished early I had some of them use watercolor on top...will share more of those later!

Sunday, March 10, 2013

he wanted to make art

My fire-truck-loving, match-box-car-obsessed son asked me to bring him to MY school the other afternoon to make art. Of course, I obliged! I had some q-tips out from a Kindergarten project and he requested paint.

DANDELIONS.

Love them.

Read more about his art-making adventure over at our collaborative blog www.prekandksharing.blogspot.com!

Thursday, March 7, 2013

wacky birds


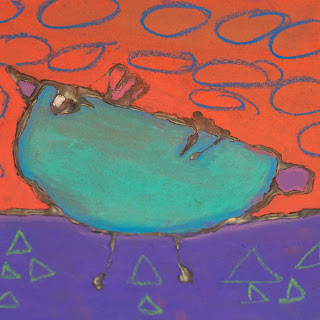
My Third graders have been working on some awesome glue-resist birds this week that I really wanted to share! First off, I pinned this free downloadable printable on Pinterest. I admit that I love those sort of handouts because they give students choices and inspiration and save tears and frustration. 

The students drew their birds in pencil on a black 12x12" sheet of paper and then traced their birds in white glue. This took an entire class period and we allowed the projects to dry.

 The next week we talked about how the state of the glue had changed: from white, wet, and sticky to clear, dry, and hard. We used chalk pastels to color the birds in. This was their first time learning to blend colors and shades, and to work with chalk in general. It was a bit of a messy experience, but they loved it!
 At the end of the project, I had them use oil pastels to create shapes or designs in the background for a little more visual interest. 


 So far they have turned out amazingly well! The kids love them, too...even though we've sprayed them, I sure hope they make it home intact :) How do you send home oil pastel drawings or chalk drawings?
Happy day, happy art.

Wednesday, March 6, 2013

Sea (salt) Turtles

Please excuse the lack of posting in the past couple of weeks. I received some "not so nice" comments, which have since been removed, and kind of put me in a blogging funk. I guess you have to take the good with the bad when you put yourself out there, right?!

I saw these adorable Sea Turtles on Pinterest and wanted my fourth graders to do them for our Kids Art Fair project. It's basically a watercolor resist with some rock salt thrown in there for a cool effect in the background.
For this project we used Sax liquid watercolors and Morton's Ice Cream Salt. You can use table salt, too, but I wanted a little chunkier effect (and in case you're wondering, it isn't expensive. The salt was $1.55 for a large box of it and I put some in little cups on each table. We went through 1 1/2 boxes in 5 classes.)
For the designs on the shells, I taught the students how to connect hexagons to form the scoots. I then gave them 6 different color choices in which to color those scoots in, most analogous color schemes.
I do love the way they've turned out, and how the salt "sucks up" some of the moisture from the paint, as well as some of the color from the paint!
I hope to post more this week...but if not, have a wonderful Spring Break!

Thursday, February 14, 2013

Paul Klee and Heart Day

Whoops! I thought I had published this post last week!!!
This time of year I really like to add in some sort of iconic "heart-ish" project...so this year I had planned on introducing my fifth graders to the art of Paul Klee.
Senecio, Paul Klee
Paul Klee had "invented" so many resist-styles in his art-making journey so I wanted to sort of emulate that in a project. This project is nothing AH-MAZING, but they're striking nontheless. I had them use black Sharpie and rulers to make 3-4 hearts, and then multiple intersecting horizontal, diagonal, and vertical lines on 12x18" paper.
They then used crayon (in color schemes-- violet, red, red-violet, pink, and white for the girls...and green, yellow-green, blue, turquoise, and white for the boys) to color in each shape that had been "created" by the intersecting lines. They were to color them in...but not color all the way to the black line, leaving a tiny bit of white paper showing.
They then used liquid watercolor paints as a resist and painted over their entire paper...fuschia for the girls, and turquoise for the boys. I'm so thrilled with the results!

Happy Valentine's Day!