Thursday, March 7, 2013

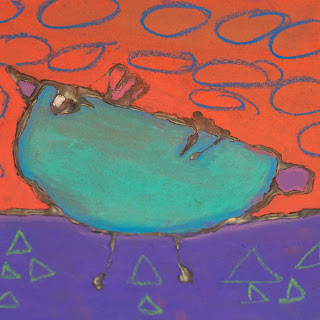
wacky birds


My Third graders have been working on some awesome glue-resist birds this week that I really wanted to share! First off, I pinned this free downloadable printable on Pinterest. I admit that I love those sort of handouts because they give students choices and inspiration and save tears and frustration. 

The students drew their birds in pencil on a black 12x12" sheet of paper and then traced their birds in white glue. This took an entire class period and we allowed the projects to dry.

 The next week we talked about how the state of the glue had changed: from white, wet, and sticky to clear, dry, and hard. We used chalk pastels to color the birds in. This was their first time learning to blend colors and shades, and to work with chalk in general. It was a bit of a messy experience, but they loved it!
 At the end of the project, I had them use oil pastels to create shapes or designs in the background for a little more visual interest. 


 So far they have turned out amazingly well! The kids love them, too...even though we've sprayed them, I sure hope they make it home intact :) How do you send home oil pastel drawings or chalk drawings?
Happy day, happy art.

Wednesday, March 6, 2013

Sea (salt) Turtles

Please excuse the lack of posting in the past couple of weeks. I received some "not so nice" comments, which have since been removed, and kind of put me in a blogging funk. I guess you have to take the good with the bad when you put yourself out there, right?!

I saw these adorable Sea Turtles on Pinterest and wanted my fourth graders to do them for our Kids Art Fair project. It's basically a watercolor resist with some rock salt thrown in there for a cool effect in the background.
For this project we used Sax liquid watercolors and Morton's Ice Cream Salt. You can use table salt, too, but I wanted a little chunkier effect (and in case you're wondering, it isn't expensive. The salt was $1.55 for a large box of it and I put some in little cups on each table. We went through 1 1/2 boxes in 5 classes.)
For the designs on the shells, I taught the students how to connect hexagons to form the scoots. I then gave them 6 different color choices in which to color those scoots in, most analogous color schemes.
I do love the way they've turned out, and how the salt "sucks up" some of the moisture from the paint, as well as some of the color from the paint!
I hope to post more this week...but if not, have a wonderful Spring Break!

Thursday, February 14, 2013

Paul Klee and Heart Day

Whoops! I thought I had published this post last week!!!
This time of year I really like to add in some sort of iconic "heart-ish" project...so this year I had planned on introducing my fifth graders to the art of Paul Klee.
Senecio, Paul Klee
Paul Klee had "invented" so many resist-styles in his art-making journey so I wanted to sort of emulate that in a project. This project is nothing AH-MAZING, but they're striking nontheless. I had them use black Sharpie and rulers to make 3-4 hearts, and then multiple intersecting horizontal, diagonal, and vertical lines on 12x18" paper.
They then used crayon (in color schemes-- violet, red, red-violet, pink, and white for the girls...and green, yellow-green, blue, turquoise, and white for the boys) to color in each shape that had been "created" by the intersecting lines. They were to color them in...but not color all the way to the black line, leaving a tiny bit of white paper showing.
They then used liquid watercolor paints as a resist and painted over their entire paper...fuschia for the girls, and turquoise for the boys. I'm so thrilled with the results!

Happy Valentine's Day!

Wednesday, January 30, 2013

Burton Morris Pop Hearts

I just finished up a unit on Pop Art with my Third Graders, focusing on the artwork of Pop Artist Burton Morris. I introduced the lesson by giving the students a brief tour through his web site and then showing them this video where he talks about his campaign with Coca Cola and what inspired his designs for Coke. 
We discussed Pop Art, icons, and popular culture. Morris' Coca Cola campaign included a highly-recognized American icon, so doing a heart for Valentine's Day was very "American" as well!

We started off with the following pieces of paper:
I had all these sheets set out and pre-cut for them. They were allowed to choose their own colors for the project.
1 9x9 sheet of black paper
1 8x8 sheet of turquoise, yellow, or pink paper, for the background
2 sheets different colored paper (for big heart) sized 6x9"
1 small piece white paper 3x4.5 for glare marks and movement lines
used scraps (trade with the person next to you) for smaller hearts


 Displayed together they look so awesome and POP-PY! This was a very timely project, as we have been working a lot on scissor technique, collage, and master artists (and it's a perfect Valentine-y project mwahahahahahaha!)
By the way! I have now gotten our Facebook page up and running! Please come follow  We Heart Art on Facebook!

Tuesday, January 29, 2013

Clay Saves the Day!

For the past 10 years I have not done "real" clay projects with my Kindergartners or First Graders. I don't know what my issue was...clay is just SO much work (for me...loading the kiln, setting the kiln, unloading the kiln, labeling work, making sure bags are zipped close, scraping scraps off the floor, refilling vinegar containers, fishing lost clay tools from drains, etc...!)

This year I took the plunge and made pinch pots with my Kindergartners and First Graders! I love how honestly and lopsided they turned out--that sort of thing makes my heart SWOON! 

More posts to come on these lumpy, lopsided little lovelies!

The Goldfish


My fourth graders just finished these adorable projects based off of Henri Matisse's The Goldfish Bowl! 
We used a 12x18 sheet of paper for the background, and created a Matisse-like cut-paper collage on Day 1. (I also read the students Mike Venezia's "Getting to Know the Artists: Henri Matisse" as a good intro. Unfortunately, I did have to staple some of the pages together because I'm not sure my students could handle nudity :( ) 
After we finished the background, we created the "table" and then painted two sheets of paper to make the fishbowl and the fish.
I just love how they turned out...and the kids worked so hard on them! 
Also, I FINALLY got around to getting our Facebook page up and running! If you'd rather "follow" on Facebook, here is our link:

Monday, January 14, 2013

My Kindergartners Aren't LION

Hope you all have had a wonderful first coupleof weeks back from vacation! We are in our second full week back and I'm really starting to pump some stuff out for Spring Art shows. They always seem to sneak up on me!
My Kindergartners are finishing up these adorable lions this week! For this project, I had them use black crayon to draw and tempera blocks to paint. I limited their pallette to Orange, Yellow, and Brown.
They did most of the painting last week with their initial drawings and did last-minute touch-ups today. They also used a little yarn to give the painting a little more visual appeal.
....and that's IT! Simple paintings with adorable results! (By the way, these are sized 12"x18")

****Speaking of yarn, I am having a VERY hard time keeping my yarn organized. Right now it is in big, flat bin(s) and it is driving me INSANE. I would rather not be a yarn beast and cut yarn for all my kids, but honestly I'm going crazy trying to keep things organized and not tangled or unraveled. I saw some ideas on Pinterest, one that peeked my interest was using baby wipe containers to keep yarn balls in and to have the kids pull the yarn through the dispensers. This looks great in theory...but seems like it'd take up a LOT of space. Thoughts? Suggestions? What works for you?