Saturday, March 10, 2012

using QR codes in art!

I've been using our brand new iPads a bunch in my classroom lately, thanks to a substantial grant from the Education Foundation of Sarasota County, Inc! My students love using them as a "center" after they are finished with their artwork, but I love using them to get kids more personally involved in their artwork by using QR codes.

QR (quick response) codes are codes that can be scanned with a smart phone (with a QR scanner app), iPad, or iPod. The scan automatically takes you to a web page (we like FotoBabble) where you can hear kids talk about their artwork, the process, the artist, their choices, etc. They've been amazing assessment tools for me, and the students have a blast recording their voices and taking photos!

To read more about the different apps I use to make the codes, head over to my contributing post on PreK and K Sharing to learn more!

Tuesday, March 6, 2012

kindergarten kastles

I first saw this lesson on Deep Space Sparkle and pinned it on Pinterest. I love how the sponge-stamped "bricks" show the texture of the castle! We used our sponge paint daubers so our fingers didn't get messy. Worked like a charm!!!


We then used a mixture of painted papers, scrap papers, fringed papers (grass), and torn papers (moat) to add in the details. The kids had so much fun....and their energy and enthusiasm for the project definitely reflected in the results!


I gave them the choice to leave them with me for a bulletin board or to take them home...


...and my bulletin board is still empty.


SIGH.


I'd better tell tomorrow's group that they HAVE to leave them with me or I won't have any decor around here!

Pin It

Thursday, March 1, 2012

papel picada

My fifth graders created these beautiful papel picada using bright sheets of copy paper! (Staples/Office Depot have reams of 500 sheets of neon paper--which you need to use because you can't really cut through construction paper!)

We used some of the techniques found in the book "Making Magic Windows" by Carmen Lomas Garza, who also explains the history behind papel picada and how she became so good at it!


Part of the fun was watching the kids as they opened up their papel picada and saw the different shapes and patterns they had created.


The other part I loved was watching them feverishly trying to layer their pieces so they were "just right"---even, symmetrical, and all visible (the three "musts" upon completion).


Just like every single one of my kids, these projects are all individuals.

Speaking of which, there is some interesting fodder over on a blog that I contribute to monthly regarding process-oriented art education and product-oriented art education. Where do you fall?If you tend to ride one side of the fence or the other, how do you nurture both theories? I find myself showing and guiding, but let the students take it from there. Many times they choose not to deviate from my examples. I left a lengthy comment about how students lose that zest for wreckless abandon once they get to intermediate elementary grades. What do you think?

Tuesday, February 28, 2012

batch watermarking using picasa

I had a few questions on my last post about "batch watermarking" photos for use on your blog. As I said before, I think it's a good idea to watermark all your photos because there are some really dishonest people out there who will try to pass YOUR idea off as their own. TRUST ME.

I like using Picasa because it's FREE and EASY! In my "other life" I am a photographer and use Adobe's Lightroom for my professional pictures because I add a graphic watermark to my photos. For now, we'll use Picasa.

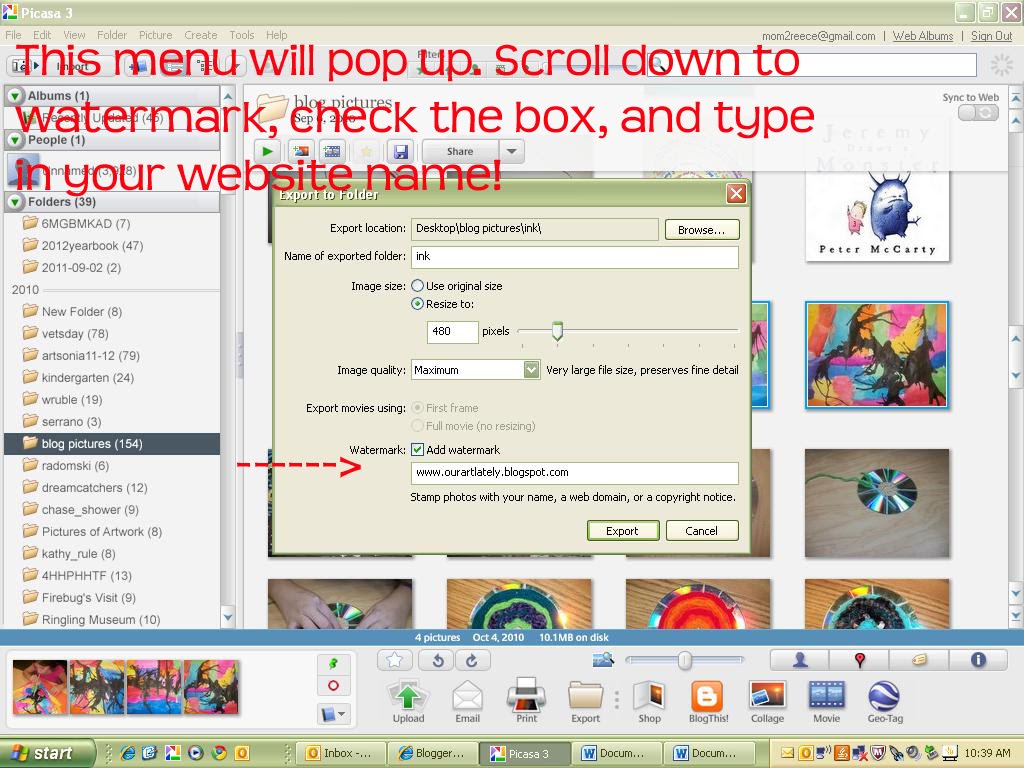
When you're in your Picasa gallery, select the photo(s) you'd like to watermark. See the screenshot above. To select multiple pictures click the first picture, go to the last and as you click on the last, hold down the "shift" key to highlight them all.

Go up to file,then scroll down to the option "export picture to folder".


This pop-up menu will come up. Up near the top, just click where you want your watermarked pictures to go. Down on the bottom there is a spot where you can check "watermark". Click the box, then right below it you can type in your web address/blog name, etc.


...and THAT'S IT! I learned the hard way, I hope this helps some of you out so you can learn from MY mistake. And please, pin away from my blog. I love seeing the things you extrapolate from my lessons and make into your own!

Monday, February 27, 2012

"pin"spiration


Like many of you (I'm sure!) I've been "pin"spired by quite a few things I've seen on Pinterest! Most of the time if there is a lesson of mine that is an original, I'll put a "pin it" button on the bottom of the post, but now, I'm pretty much granting full pinning rights from my blog to Pinterest because I have this handy dandy "permission" pin over there>>>. You can get it, too, if you like your stuff pinned!

One thing that I have done more of lately, however, is watermark my photos that I use in blog posts. I'll never forget the first time I saw one of my students' projects on Pinterest and it had been snatched with no credit given to me (or to my student, I should say!) and had been repinned 57,000 times. Yes, 57,000 times and someone passed my exact photo off as their own....so I've been watermarking more. It's a good idea that you do it, too.

While in Art we're all "borrowing" ideas from one another, from a Master, a children's book, something in nature, or an idea on Pinterest....our artwork belongs to our kids. Make sure you've given yourself credit!

There are a lot of photo editing programs out there that will "batch" watermark your photos for you. For ease at school I prefer to use Picasa, and at home I like Lightroom. If you need help watermarking your photos in either of these programs, leave me a comment with your email and I can email you instructions!

Thursday, February 23, 2012

watercolor o'keeffe's

I love working on O'Keeffe projects every year...she's a great AMERICAN artist to discuss and her work really makes my kids LOOK at what they are drawing. Sometimes it is just so hard to have students draw what they SEE and not what they THINK THEY SEE.

Last year we did some beautiful O'Keeffe's using a viewfinder and magazine/calendar pictures. This year we used the same basic technique for drawing the flowers, enlarging the pictures onto a 12x18" sheet of watercolor paper.


This year I wanted to do something a little different, and decided to focus the project on contour line and contoured details. I had them use black pen to outline their drawings, then use watercolors to paint orgainic shapes over the tops of their flowers.
This was my "pin"spiration, this wet-on-wet flower I saw on Etsy. The shop is called "Terrace Gallery".


Some students really understood the concept of organic-vs-geometric shapes, and some just had fun with color. Either way, I'm loving the results!


As usual, thanks for stopping by!

Pin It

picasso's guitars

Our Inspiration: Violin Hanging on the Wall. Possibly begun Sorgues, summer 1912, completed Paris, early 1913
Pablo Picasso (Spanish, 1881-1973)Oil, spackle with sand, enamel, and charcoal on canvas25 9/16 x 18 1/8" (65 x 46 cm)Kunstmuseum Bern. Hermann and Margrit Rupf Foundation

We used ALLLLL sorts of nick-nacks and doo-dads for this project, and I suppose the sky is the limit! For the guitar bodies we used Folia corrugated colored cardboard. Lots of painted papers were used for different pieces and parts, and the backgrounds were made with tempera and texture palettes.

The only "direction" I gave them was that they had to incorporate music notes and a piano keyboard into the background somewhere. The rest was up to them!

These were made by third graders, and took 2x 55-minute classes. The finished size is 18"x24".