Showing posts with label kindergarten. Show all posts

Monday, September 10, 2012

organic shape monsters 2

This project which focuses on imagination and geometric-vs-organic shape is one of my favorite lessons to teach! I've shared my students' results here before, and today I've featured the lesson over at PreK and K Sharing! It remains my most-viewed lesson on my blog :)

My kindergartners love this project and I am always stunned with their amazing, colorful results! If you do this project with your kiddos, please leave a link to their work in the comment section...I LOVE going back to see what others do with the same lesson!


Tuesday, April 17, 2012

shape tigers

One of the things I love MOST about my job is when a kid "gets it"...and has an "OMG! THIS IS AWESOME and SOO EASY" moment in Art. There are so many times I hear "I can't draw a tiger, I can't make this, Art is so hard for me" that I start to re-evaluate my teaching(s) and lesson plans.

In Kindergarten, I like to use fool-proof lesson plans, and this was a new one that they LOVED!


This was my inspiration, found on Pinterest. I love the cartoon-y look of the cat!


I started out with the students making a giant X in black crayon on the paper. We went from there filling in facial features, stripes, and watercolor painting the background.


I think if I could teach a grade of Art forever, it'd be Kindergarten. They are just so honest about their artwork and savor and adore every little thing they learn and create!!!


I also love their different interpretations of the exact same set of instructions!


We are making work that reflects their Science curriculum right now, which is HABITAT. We added the leaves along the perimeter to frame out the work and add a habitat.


Aren't these SO sweet?!

Friday, April 6, 2012

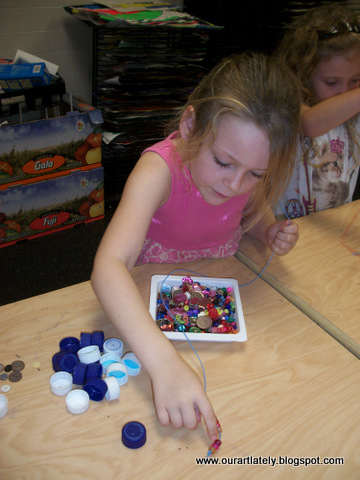
bottlecap snakes

This project was...
...honestly the most fun my Kindergartners have EVER had making a project.
...their "most favoritest project in the world"
...an insane amount of prep for me, but worth every minute
...good for putting a HUGE dent in my stash of soda bottle caps!

PREP:
A few years ago I asked students to save bottlecaps. I had millions of them, and I stored them. Why? Because I am an art supply hoarder.
Ahem.
I had this brilliant idea to make snakes out of them, so I had my husband painstakingly drill holes in (not kidding, really) about 3,000 of them.
Yes, we are still married. Yes, he still speaks to me.

MATERIALS NEEDED:
1 piece floral wire, about 20" long
pre-drilled bottlecaps
various pony beads
various sized buttons
"googly" eyes
wire-cutters (optional---we used scissors)

To start, I had each student tie a knot at the end of their wire. They then used 8 beads to string on and make the tongue.


We then re-examined PATTERN and how we could use pattern to make our snake. Each student had 20 bottlecaps and strung them on in an A,B,A,B pattern. You can see in the picture above, it is important to string them on upside-down. You will see this at the end, as you have to glue the eyes on the top of the lid (it will make sense, I promise!)


When you get to the last bottlecap (#20), you must put it on backwards. This is the back of the snake. Next, it's time to make the "rattler". We do this using buttons! Students choose 8 buttons and sort them from largest to smallest. They then string them on large to small (so it looks like a rattle), tie a knot to end the snake, and clip any remaining wire off.


I gave them some colored Sharpies to color patterns or lines on the white bottlecaps.


See the front of this snake? This is the direction you must string them on so you can glue the eyes on. Not really sure why this student insisted on making black eyes, but whatever!


They named them and played with them. They absolutely LOVED this project, I am NOT kidding! This is the perfect project for Earth Day, or a thematic unit on repurposing products. The kids came in the next week and told me how they had made things at home out of toilet paper rolls and masking tape. I love hearing that kind of stuff, because that tells me they were excited about something we did! You can't hear that enough, right?!


If you are inspired and start asking your students to bring in bottlecaps, BE YE PREPARED! They will come in droves (especially if you make a prototype and show them what they will be making!)


Happy Creating!

Tuesday, March 6, 2012

kindergarten kastles

I first saw this lesson on Deep Space Sparkle and pinned it on Pinterest. I love how the sponge-stamped "bricks" show the texture of the castle! We used our sponge paint daubers so our fingers didn't get messy. Worked like a charm!!!


We then used a mixture of painted papers, scrap papers, fringed papers (grass), and torn papers (moat) to add in the details. The kids had so much fun....and their energy and enthusiasm for the project definitely reflected in the results!


I gave them the choice to leave them with me for a bulletin board or to take them home...


...and my bulletin board is still empty.


SIGH.


I'd better tell tomorrow's group that they HAVE to leave them with me or I won't have any decor around here!

Pin It

Wednesday, February 22, 2012

makin' macchia

My kindergartners are making these beautiful "Macchia" in the style of Dale Chihuly! These are SUPER duper easy to make and every single one of them turns out breathtakingly beautiful.


Before we even started, I showed them a portion of the video "Chihuly in Action" so they could see how glass is actually blown and made. We then viewed some macchia from the Macchia Loop on his website. We talked about how "macchia" means "spotted" in Italian and about the process we would use to create Macchia of our own without using the dangerous supplies Chihuly uses to create the real deal. The kids loved how Chihuly initially called his Macchia series "the uglies"!!!

You will need:

3 coffee filters per child

Water-soluble markers (Crayola work perfectly!)

HEAVY spray starch

cups or yogurt containers

rubber bands

mat-board for final display


*I found that 3 works nicely for a display and they were able to complete this many in one class period. Obviously, vary this for your needs!


Process: Have students use marker to color designs on the coffee filters. Make sure you have something underneath (scrap paper or place mat) to catch the colors because they bleed through. Lay completely colored filters over cups and secure with rubber bands. I allowed my students to spray their own projects with the starch. They loved to watch the colors bleed together! It takes about 6-8 hours for the macchia to completely dry. It takes about 6-8 hours for the macchia to completely dry. When they were dry, we took them off and arranged them on a piece of 8x8 matboard!

You could extend this project in many different ways--


  • Make a "ceiling" of Macchia similar to the ceiling at the Bellagio in Las Vegas

  • Have students use color schemes on each different coffee filter (complimentary, secondary, primary, tertiary, hot, cool,etc)

  • Have students re-tell the macchia-making process or write about it (cause and effect)

*We used our iPads and an app called Fotobabble to re-tell the process of creating the Macchia. These Fotobabbles were displayed with the students' work. More on that later!


Happy Macchia-making!

Thursday, May 26, 2011

we ain't gonna paint no more! (splatter painting)


This book, called "Ain't Gonna Paint No More" by Karen Beaumont (illustrated by David Catrow) is an Art Teacher's delight. It's a sing-songey book about a mischevious little boy who sneaks into his paint stash and gleefully paints himself silly. I am in love with the illustrations in the book, and my kindergartners like to "guess" what body part he's painting next using rhymes.


It's a fitting book to read at the end of the year, too. Guess what? We Ain't Gonna Paint for another 2 months! We might as well enjoy our last couple of days here. *Really you can do this lesson anytime, I just like having projects that really hook the kids in at the end of the school year for my own sanity!


After reading the book, we talk about illustration and self-portraiture. Do we think the boy in the book was a portrait of the illustrator, David Catrow, as a child? Students then draw (in crayon) a self-portrait on 12x18" paper. This is the "clean"version of themselves, the angelic child their parents think they are! On day 2 we put our papers in our splatter box (a big paper towel box---which looks SO lovely on day 7 of this project!) I thin down some red, yellow and blue paints (in case they mix on the paper we still have nice colors and not muddy colors) and show the kids how to shake and splatter.


Needless to say they LOVE it!


The end results make me laugh after a long day of "sit, stop, come here, go there, tie your shoes, put your shoes on, yes you may go to the bathroom, time to clean up, push that chair in".


Happy splatters!

Thursday, April 7, 2011

bunny sculptures

These are great centerpieces, egg-hiding-places, and just all-around wonderful paper sculptures of bunnies! I make these with my Kindergarten and First Graders each year and they love them every single time! Materials you will need: 1 9x9 sheet green paper (for "grass") 2 9x3 pieces of white paper (for the bunnies' bodies) -- you could sub toilet paper tubes for these 1 4 1/2x6 piece of white paper for the ears and feet 1 small piece pink paper (for nose and ears) 1 small piece blue paper (for eyes) wiggle eyes (I use the sticker eyes from SAX Arts) 1 cottonball some crinkly easter grass (just for fun!) I will post a step-by-step tomorrow. My camera is M.I.A and I had to take these from my cell phone!

Monday, November 1, 2010

Kindergarten's Composition VI

This is a project inspired by Wassily Kandinsky's Composition series of paintings. I have done this project two ways: one with bleeding watercolors in the background and this one which is done with bleeding tissue paper for the background. Both turn out equally as gorgeous!

We discuss Kandinsky and how he used music as an inspiration for his paintings. As he worked with a composer, his paintings depict the tones and tempos heard in the music. On day one we dedicate the entire class period to painting the background. Of course with the tissue paper I tear all the pieces up and the kids use glue water to "paint" on top of the tissue to make it stick and bleed into the other colors. This usually takes the entire class period.


On day two we take a vote on what kind of music we will listen to while we paint. On this particular day the kids voted on a violin concerto. While the music is playing, the kids use ONLY black paint to "paint what they hear". As you can see on the painting above, she painted long, swirly lines--most likely depicting the long runs you would hear in the concerto.


Whether or not the kids "get it" every one of these projects turns out awesome and SO colorful! These are definitely a favorite every year!


PreK + K Sharing

Thursday, September 30, 2010

Fall Leaf Stamping

Here in Florida we barely have a change of seasons from summer to winter. We don't have leaves that change to beautiful fall colors and fall off the trees, and we don't have crisp autumn air. Actually right now, the last day of September--- it's 90 degrees.

Ahhhh, welcome fall! I love to do this project on fall leaves, though, to demonstrate color scheme and printmaking all in one. My kindergartners love it and even my older kids reminisce once they see the rubber leaves come out. My fifth graders would do this over and over and over again if I let them...I think.

What you need:
Rubber stamping leaves (these are expensive, but non-consumable and have held up well for 10 years!)
Block tempera paints
Clothespin/sponge daubers (more on these in a minute!)
Brushes, water bowl, etc. for paint

Logistically, here is how I work it: I have 9 tables in my room. Each table has a colored piece of paper on it: one red, one yellow, one orange, repeat. When students sit at their tables they are ONLY allowed to use the color that is on their table. In the photo above, you see a yellow piece of paper on their table. Lookie there! She is using yellow paint. She has to paint and stamp 3 yellow leves.

After about 5-7 minutes to paint and stamp their 3 leaves (my classes are 55 minutes each) I have them move to the next color table. Three times moving and they have 9 leaves on their paper, three of each yellow, orange, and red. Yes, the kids are moving around the room, but it is VERY orderly, and it keeps paint colors from getting mixed!

To fill the negative space, I give the kids one of my inexpensive sponge daubers. I made these from scratch after washing 178,735 grubby kindergarten fingers when they freaked out about getting brown paint on their fingers!
I took old wooden clothepins and put a small 1/2"x1/2" kitchen sponge and put it in there. The kids get it "a little" wet and then use the brown tempera paint. The only part they are allowed to touch is the clothespin---and hands stay virtually clean! The only thing I have to worry about with the kids on this one is that they "brush" the sponge (like a paintbrush) instead of daub (up and down, up and down) to fill the negative space with brown.

And VOILA! A fun, easy, one-day project the kids love...and parents adore for their fall decor!
Happy creating!