Showing posts with label second grade. Show all posts

Wednesday, January 25, 2012

heARTwork, project 1

My younger students (grades K-2) are emulating the work of Jim Dine right now. We have a BUNCH of heart-related things going on at school right now, so while I usually don't like to do "Valentine's Cute"---I thought these would be a great tie-in to all things "heart".

The background has been created out of tissue paper "painted on" with a glue/water mixture. I love this technique because it creates a really cool tie-dye look! Next, the kids used a large (half) heart template to make the black heart (we drew on them with oil pastel first). Then they glued them on to construction paper and used the "fancy scissors" to cut a border around the heart.


I wasn't really sure what I wanted to do for the third heart layer until I saw these from Melissa at the Chocolate Muffin Tree! We cut out the hearts first (using the fold-symmetry technique) and put a little paint inside and pressed. I forgot how much fun that was! I'm sure you could use any sort of painted paper or media for another layer!


Lastly I had them use the leftover tempera to make swirls and lines that radiate from the heart. If they had lots of extra time they used oil pastel as accents.


We did this project in two class periods---one to create the background and the black heart, the second we did all the layering and accents. I did this project with my second graders.


I just love their heARTwork!!!

Pin It

Monday, January 9, 2012

more luli sanchez dot paintings

As I was passing back artwork in second grade today I realized that I hadn't posted more pictures of our luli sanchez dot/circle stamps! While I know this idea isn't unique, you may want to check out some of some of her beautiful and inspiring fabrics! My original post is right here.


Happy stamping!

Monday, November 28, 2011

The Coke Bears

My Second graders have been discussing different careers that would require some Art knowledge and they are totally enlightening themselves! They are realizing that MANY, MANY careers out there require some knowledge of color, graphics, design, etc. It's so fun to see their little minds work!

I heard recently that Coke was putting out new Coke cans for the Holiday Season which would be white with polar bears on them, and a portion of the proceeds from these special cans would go toward protecting the polar bears. To my kids, it's just another Coke can. After today, though, I really hope they realized that someone designed that can, probably someone with an artistic bone in their body.

The Coke polar bear campaign has been around since 1922! Over the years the commercials and print ads have really evolved...but this is an ad that my students can relate to! So today, after reading about the lore of the Coke polar bears, we whipped up some of our own. We used 12x18 blue paper and styrofoam printing paper. The kids drew their polar bear onto the styrofoam and printed it. We used the leftover styrofoam to make small nose, eye, and mouth stamps. Lastly, we used fabric scraps to make a scarf. I had a bunch of kids that wanted to "dress them up" even more, so I may just let them go to town next week with the fabric and yarn bins and see what they come up with!

Here is an example of the bears before I give them artistic license next week! I will be sure to post some "after" pictures, too!

Wednesday, May 25, 2011

name aliens

I love doing this project with my second and third graders. It's a great way to teach organic shape and symmetry...creativity and imagination are of upmost importance as well! This is also a great project to do at the end of the year when you feel like you're "losing" the kids--they always perk up when I tell them we're making monsters or aliens.

Start with a folded sheet of paper. To make sure the pieces come out symmetrical and not in two pieces, I tell them to point the FOLD toward their BODY. They then write their names on the paper (if they have a shorter name with extra space, have them use their last initial too).


I then have them draw a contour line around the top of their name. They cut on that contour line.

When they open up their "name", they have a unique organic shape that resembles an alien or monster body. I have them draw details in pencil, trace in black sharpie, then color in marker.


I have students say they make entire "families" of aliens at home (using Mom's name, Dad's name, their dog's name, their brother's name, etc.) This is also great for a "rainy day" project at home or at school.


I know this isn't a new concept or anything, but sometimes it's nice to be reminded of simple lessons that can be pulled out of the "vault" in a pinch for a lesson. It's also a great way to teach symmetry, organic shape, contour line, geometric shape, etc. A win/win if you ask me!

Tuesday, May 10, 2011

painted peacocks

This is a terrible picture of this project and doesn't do the poor guy any justice! I cut down a white paper to 10x16" (so it would be the perfect size to mount). We drew a resist on the white paper in white crayon and used blue glitter watercolor paint to paint over the resist. We then used some blue and purple tempera to paint the body and feathers.

The "eyes" on the feathers are layered paper circles and we also used black crayon to trace inside each of the feathers since the fringe kind of got lost in the painting process.

Lastly, we mounted on black paper and used silver Sharpies to make a framed border. These were so fun to make and are very striking in "real life"!

Monday, January 31, 2011

the cutest owls you've ever seen!

At Christmastime I saw these fabulous felt owls on That Artist Woman's Blog. I swore to myself that we'd make some owls...and then..well, time got away from me and missed that opportunity!

Fast forward to January--second graders do a HUGE unit on Audubon in Science and most of the time I piggy-back on their lessons. This year I wanted to do something super-fun for them and decided it was time to rock the owls! The prep for this project is not toooo bad (it's half origami, half drawing) but there are quite a few pieces involved.

You will need:
1 5" or 6" circle tracer for each child
4 colored pieces of paper for each child (I used 6"x9")
1 large 12x18 sheet of black paper
4 strips of scrapbooking paper (appx. 1.5"x4")
various pieces for beaks and eyes
feathers (optional)

I had each student make 4 owls. This way they could pick out their "favorite" three to use on the project. This works out well because inevitably a second grader will ruin one of them and will cry!
This project took two days, using the following steps:
Trace and cut out 4 5" or 6" circles on bright paper (you could use browns, whites, and grays, I suppose as well!). Glue the scrapbook paper on (put only a dot on the very bottom of the strip, the part that is closest to the bottom of the circle--this is VERY important!)
Fold the top of the circle down, right above the scrapbook paper. You will actually fold the flap over the scrapbook paper.
Fold in the "wings" diagonally---from the bottom corners of the scrapbook paper to the corners of the top flap.
Pull your scrapbook paper through the fold(s) and glue it to the front of the top flap. Glue the wings down and the top flap down as well!
Add layered eyes, beaks, and feathers! *(Note: to make the eyes out of layered papers, start with the black circle first. Glue the black circle onto the white paper, cut out the white paper, and glue the white onto a colorful piece of paper! This insures that your eyes are layered and EVEN!)
Use oil pastel (or paint?!) to create a branch for your owl family to sit on. Glue the owls down and you've got a beautiful mixed-media work of art!
*My second graders are finishing these this week. This is MY example, I will be sure to post a second-grade gallery of owls later this week!


Saturday, October 30, 2010

Fall Collage

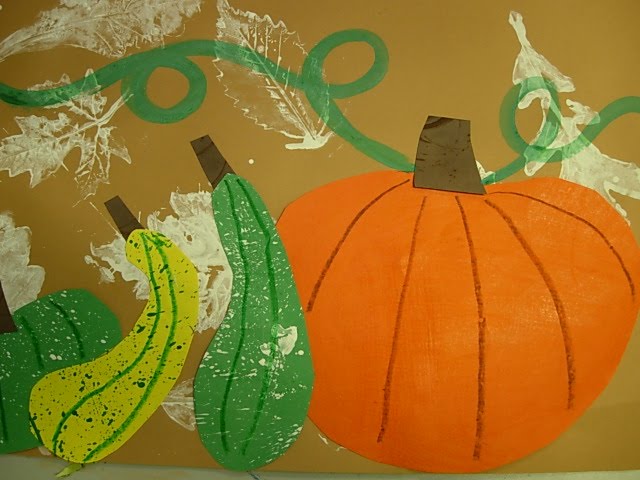
This project is a favorite of mine from last year for second and third graders. What parent wouldn't want a lovely fall collage hanging in their house for Thanksgiving/Harvest?!

Day one is all about prepping the different papers. To get all the different elements, I set up stations on Day 1 of the project. I have 9 tables in my room and every other table had a station set up at it. Of course you can set up your own, these are merely suggestions for how to get some great Eric Carle-style papers for the collage.

Station 1: texture rubbings--red orange crayon on 9x12 orange paper (for big pumpkin)
Station 2: splatter box-- green paint on 6x9 yellow paper (for squash)
Station 3: finger-flick splatter-- white on two 6x9 green papers (one for squash, one for small pumpkin)
Station 4: White paint with leaf stamps on brown 12x18 paper (for background)

Day two is all about the assemblage: Draw and cut out squash, gourds, pumpkin, stems (from dark brown paper) and draw lines on them to represent the texture. Use green paint to make an interesting green vine attached to the pumpkin.

Some kids had extra time so they cut more out of the green papers and added leaves to the vine or to the pumpkins. Some used scrap red, orange, or yellow pieces from the scrap bin to make some maple leaves floating by.
We hung these around our school and in the local Publix. They were so popular and looked GREAT!

Saturday, October 2, 2010

Jasper Johns' Alphabet

Inspired by the Jasper Johns painting "Numbers", I thought this project would be a wonderful way to introduce students to the work of Jasper Johns and to create a piece of Pop Art!

First of all, I pre-folded all the papers. I used 12x18 white paper and folded it into 24 symmetrical boxes. What? You say the alphabet has 26 letters in it?! Well, we'll get to THAT in a minute!
I had the students use ALL CAPITAL letters so they would be uniform. We started with the letter "A". I did the rows like this:
ABCD

EGFHI

JKLM

NOPQR

STUV

WXYZ

On the lines where I had to squeeze 5 letters, we worked in the middle and then out from each side. I didn't tell the kids WHY we did this when we did it, but at the end they told me "oooooh, now I know why we did that!"
After the letters were written we used crayon (sans black and brown) to "color trace"---yes, I told them I invented this thing called color tracing. It's not tracing, it's also coloring. I told them if they didn't use my invention this time they would never be able to use it in the future.

I'm good like that.

Anyway, this will come in verrrrry handy for when you do the watercolor resist on the top of each one! If they don't press hard their letters will disappear under the paint.
For the next portion (day 2), use watercolor paints. I like to use the Crayola 16-color watercolors. There is obviously more of a variety there. Students will use ONE paint color to paint in each box (up to the fold). On the lines where there are 5 letters, they simply make a box around each letter and paint it in.And VOILA! A super-fab piece of Pop Art which is sure to brighten up your fridge. Or classroom. Or office.
Happy Creating!

Thursday, September 30, 2010

Folk Art Sewing with Beads

I'm absolutely LOVING how these projects have turned out! Last year I ordered two bolts of black burlap for a project and I have ended up with SO much excess! I'll have to be creative and think about black burlap projects for (really) two or three years!

My second graders have recently asked me "is this art? Is that art? How did they get famous making that?" I love questions like this because it allows me to segue right into teaching about Folk Art (namely Southern Folk Art) which I have such appreciation for, you know, with them being self-taught and all!

What you need:

8x8" square pieces black burlap (or any other color, I just had extra (lots of extra!) black

about 3-4 feet colorful yarn per student

random beads, buttons, etc

metal yarn darners with a thin eye

Procedure:

We did this project proceeding a paper weaving project, so the kids were familiar with the "over under over under" portion of sewing. I knotted all the yarn and put the darners on for them (told them the first was a freebie, they needed to thread the needle if it came out!)

I put a ton of beads, buttons, and baubles in trays on each table.

The kids threaded buttons and beads (max 6) and stitched. They had to have 2 plain stitches between each bead thread. This eliminated their need to use 139,856 beads on each project (and it helped to fill in the negative space!)

This project took two days from start to finish. The kids worked really well sharing the beads and not fighting over soccer balls, letters, etc.

And hopefully they learned a little about self-taught artists like Bessie Harvey in the process!

Happy creating

Tuesday, September 28, 2010

Matisse-terpieces

A couple of weeks ago I pulled down a pretty suspect box that wasn't labeled. Gah! It was filled to the max with scrap papers! This was VERY unlike me, I normally have everything labeled and sorted.

I was teaching my second graders about geometric and organic shape anyway, so we whipped out the book "When Pigasso Met Mootisse" (side note: if you have NEVER read this book, I highly recommend it. It is VERY funny and has some great artistic puns in it. It is by Nina Laden and I think I ordered it on Amazon.com) Who better of an artist to work on than Henri Matisse and his colorful organic-shaped works of art?!

I had students use up those colorful scrap papers by letting their "scissors do the walking"...no, there was no drawing involved in this project at all!
I thought some of my second graders were going to have heart attacks when I told them we wouldn't be using pencils. The thought of actually doing something without reservation is pretty tough for them!

What you need:
Tons of scrap paper
9x12 black paper (or white paper, it doesn't matter)
glue sticks (trust me---you don't want all that white glue squishing out everywhere!)
scissors

Procedure:
Read the book "When Pigasso Met Mootisse" and discuss how Mootisse uses large blocks and shapes of color to create images that jump off the page. Discuss the actual artist Matisse and how the book is loosely based on his life and art.

Show students how to use scissors to create organic shapes. I also showed them how sometimes the negative portion of a paper (aka- the SCRAP) is just as cool as the shape they cut out! They were pretty excited about that and started glueing those on too, just like Matisse!

The end products were amazing. The kids did a great job. It was really important to me that the kids just created without worrying about making things look "perfect". This is also a good project if you need to get rid of some scraps or you need a one-day lesson.

Happy Creating!